Vue 组件化编程
组件
实现应用局部功能代码和资源的集合
非单文件组件
非单文件组件即所有组件写在同一个文件里。
基本使用
定义组件:
- 使用
Vue.extend(options)创建,和new Vue(options)的区别;el不写,最终所有的组件都要经过 vm 的管理,由 vm 的el决定服务哪个容器data必须写成函数,避免组件被复用时,数据存在引用关系- 使用
template节点可配置组件结构
注册组件;
- 局部注册:
components选项 - 全局注册:
Vue.component('组件名',组件)
使用组件:<school></school>
<div id="root">
  <hello></hello>
  <school></school>
</div>// 创建 student 组件
const student = Vue.extend({
template: `
<div>
<h2>学生姓名:{{studentName}}</h2>
</div>
`,
data() {
return {
studentName: '张三',
}
},
})
// 创建 hello 组件
const hello = Vue.extend({
template: `
<div>
<h2>{{name}}</h2>
</div>
`,
data() {
return {
name: 'Tom',
}
},
})
// 创建 school 组件
const school = Vue.extend({
name: 'school',
template: `
<div>
<h2>学校名称:{{name}}</h2>
<student></student>
</div>
`,
data() {
return {
name: '北京大学',
}
},
// 组件嵌套
components: {
student,
},
})
// 全局注册
Vue.component('hello', hello)
new Vue({
el: '#root',
// 局部注册
components: {
school,
},
})注意事项:
- 组件名
- 一个单词:school, School
- 多个单词:my-school, MySchool(需要 vue-cli 支持)
- 使用组件
<school></school><school />(需要 vue-cli 支持)
const school = Vue.extend(options)可简写为const school = options。这是脚手架里<script>代码的简写来源。
import HelloWorld from './components/HelloWorld.vue'

export default {
  name: 'App',
  components: {
    HelloWorld
  }
}

// 完整写法
const vc = Vue.extend({
  name: 'App',
  components: {
    HelloWorld
  }
})
export default vc关于 VueComponent 构造函数
- 组件本质是一个名为
VueComponent的构造函数,不是程序员定义的,是Vue.extend生成的
const school = Vue.extend({...})

console.dir(school) //ƒ VueComponent (options)使用组件时,Vue 自动创建组件实例对象,即
new VueComponent(options)是 Vue 做的每次调用
Vue.extend,返回的都是一个全新的VueComponent构造函数
const school = Vue.extend({...})
const student = Vue.extend({...})

console.log(school === student) // false组件的
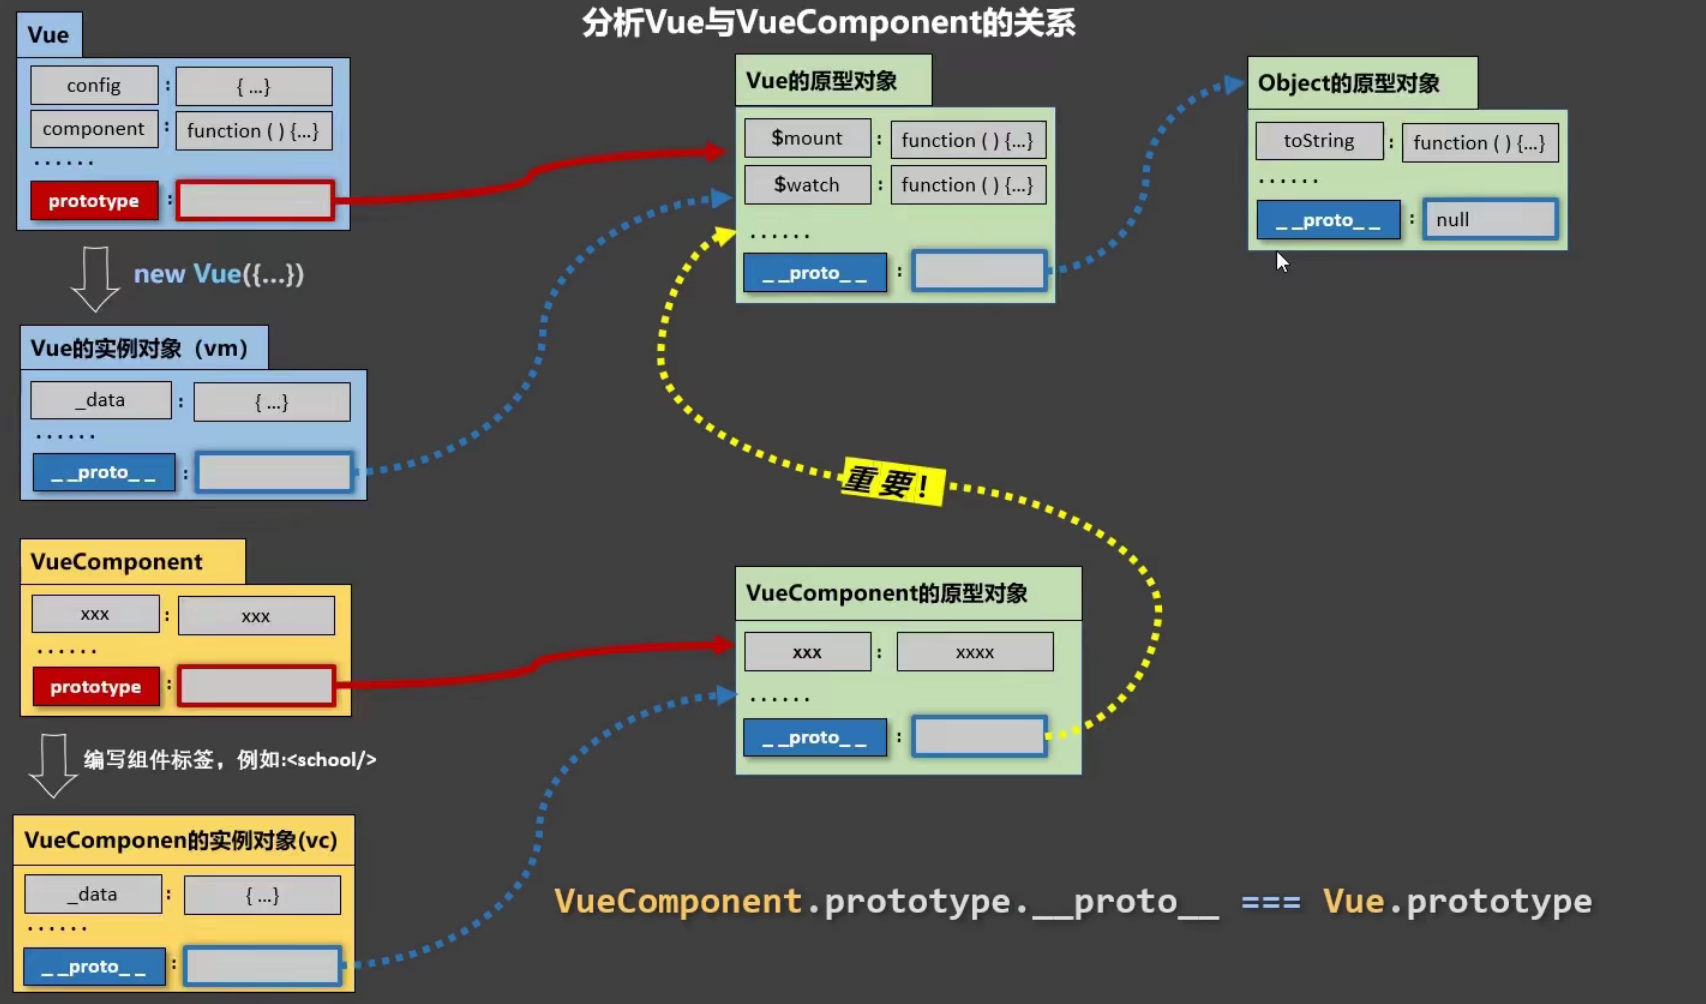
this指向VueComponent实例对象,而非 Vue 实例对象重要的内置关系:
VueComponent.prototype.__proto__ === Vue.prototype,这个改动使得组件实例对象得以访问 Vue 原型上的属性方法
单文件组件
单文件组件即 .vue 文件
scoped 解决样式冲突
- 原理:为当前组件所有 DOM 元素分配唯一的自定义属性,写样式时使用属性选择器防止样式冲突问题
scoped只给子组件最外层的 div 添加了自定义属性[data-v-xxx],子组件内部的标签并没有添加。因此父组件只能修改子组件最外层的 div 样式,修改子组件内层元素的样式是不可行的- 若想让某些样式对子组件生效,需使用
/deep/深度选择器
/* 细细品味 */
<style lang="less" scoped>
.title {
  /* 不加 /deep/,选择器格式为 .title[data-v-052242de] */
  color: blue;
}

/deep/ .title {
  /* 加 /deep/,选择器格式为 [data-v-052242de] .title */
  color: blue;
}
</style>组件通信
自定义属性 props
父传子、子传父
props 验证:
- 基础类型检查:
String, Number, Boolean, Array, Object, Date, Function, Symbol - 多个可能的类型
- 必填项检查
- 默认值
- 自定义验证函数
validator props是只读的,若是对象,对象内部的修改不报错,但不推荐。若需修改,则把props内容拷贝一份到data进行修改
父传子:
<!-- 父组件 -->
<!-- 若 props 属性使用驼峰命名法,可使用驼峰形式或短横线分隔形式 -->
<Son :num="count" :msg="message" :pub-time="time"></Son><!-- 子组件 -->
<p>父组件传过来的值:{{ num }}</p>
<p>父组件传过来的值:{{ msg }}</p>// 数组形式
props: ['num', 'msg', 'pubTime']
// 仅限制类型
props: {
num: Number,
msg: String
}
// 对象形式
props: {
num: {
type: Number,
default: 0
},
msg: {
type: [String, Number],
required: true,
validator(value) {
return value === 'hello' || value === 1
},
default: 1
}
}子传父:
- 父组件通过
props给子组件传递函数,子组件调用该函数即可修改父组件的数据 - 组件
methods里函数的 this 始终指向该组件实例,可理解为 Vue 底层对这些函数做了bind处理 - 通过
bind修改 this 指向后的新函数,其 this 指向不能再次修改。官网说明 - 思否文章
- 不推荐该方式进行子传父,推荐使用自定义事件
<Son :addCount="addCount"></Son>export default {
data() {
return {
count: 1,
}
},
methods: {
addCount() {
this.count++
},
},
}export default {
props: ['addCount'],
methods: {
add() {
this.addCount()
},
},
}自定义事件
自定义事件可用于实现子传父
子组件触发自定义事件,并传递数据:
// 子组件
data() {
  return {
    count: 1
  }
},
methods: {
  add() {
    this.count += 1
    this.$emit('count-change', this.count)
  }
}父组件监听子组件的自定义事件,并调用回调函数处理数据:
- 父组件通过
this.$refs.xxx.$on('事件名称',回调)监听子组件自定义事件时,回调函数要么配置在methods中,要么用箭头函数,否则 this 指向会出问题 - 组件上也可以绑定原生 DOM 事件,需要使用
native修饰符 - 若想让自定义事件只触发一次,可以使用
once修饰符,或$once方法
<!-- 方式一 -->
<Son @count-change="getNewCount"></Son>
<Son @count-change.once="getNewCount"></Son>

<!-- 方式二 -->
<Son ref="sonRef"></Son>

<!-- 监听子组件原生 DOM 事件 -->
<Son @click.native="handleClick"></Son>export default {
data() {
return {
father: 1,
}
},
methods: {
getNewCount(val) {
this.father = val
},
},
mounted() {
// 方式二
this.$refs.sonRef.$on('count-change', this.getNewCount)
this.$refs.sonRef.$once('count-change', this.getNewCount)
// 或
this.$refs.sonRef.$on('count-change', (val) => (this.father = val))
},
}解绑自定义事件this.$off():
// 解绑单个自定义事件
this.$off('count-change')
// 解绑多个自定义事件
this.$off(['count-change', 'add'])
// 解绑所有自定义事件
this.$off()EventBus 全局事件总线
思想
弄一个所有组件实例都能访问到的 Vue 实例对象,Vue 原型上包含事件处理的相关方法,包括 $on, $emit, $off, $once
方式一
安装全局事件总线:
// main.js
new Vue({
  ...
  beforeCreate() {
    Vue.prototype.$bus = this
  }
  ...
})数据接收方为自定义事件绑定回调函数:
export default {
  methods: {
    handleData() {...}
  },
  created() {
    this.$bus.$on('share', this.handleData)
  },
  beforeDestroy() {
    // 组件销毁,解绑事件
    this.$bus.$off('share')
  }
}数据发送方触发自定义事件:
export default {
  methods: {
    sendData() {
      this.$bus.$emit('share', 666)
    },
  },
}方式二
创建 eventBus.js 模块,并向外共享一个 Vue 的实例对象。
// eventBus.js
import Vue from 'vue'

export default new Vue()在数据发送方,调用 bus.$emit('事件名称', 要发送的数据) 方法触发自定义事件。
// 数据发送方
import bus from './eventBus.js'

export default {
  data() {
    return {
      message: 'hello',
    }
  },
  methods: {
    sendData() {
      bus.$emit('share', this.message)
    },
  },
}在数据接收方,通过 bus.$on('事件名称', 事件处理函数) 为自定义事件注册事件处理函数。
// 数据接收方
import bus from './eventBus.js'

export default {
  data() {
    return {
      msg: '',
    }
  },
  // 细节1:在 created 钩子中注册函数
  created() {
    // 细节2:使用箭头函数,则 this 指向该组件而非 bus
    bus.$on('share', (val) => {
      this.msg = val
    })
  },
}消息订阅与发布
TIP
与全局事件总线很相似,因此一般用事件总线,不用这个
安装第三方库 PubSubJS :npm install -S pubsub.js
订阅消息:
import pubsub from 'pubsub-js'

export default {
  methods: {
    handleData(messageName, data) {...}
  },
  created() {
    this.pubId = pubsub.subscribe('share', this.handleData)
    // or
    this.pubId = pubsub.subscribe('share', (messageName, data) => {
      console.log(data)
    })
  },
  beforeDestroy() {
    // 组件销毁,取消订阅
    pubsub.unsubscribe(this.pubId)
  }
}发布消息:
import pubsub from 'pubsub-js'

export default {
  methods: {
    sendData() {
      pubsub.publish('share', 666)
    },
  },
}ref / $refs
ref 用于给 DOM 元素或子组件注册引用信息。每个 vue 实例都有 $refs 对象,里面存储着 DOM 元素或子组件的引用。通过该方式可以获取到 DOM 元素或子组件实例。
可以父传子,也能子传父。子传父要和自定义事件搭配使用。
<!-- 引用 DOM 元素 -->
<p ref="pp">这是段落</p>
<button @click="getRef">获取 DOM 元素</button>

<!-- 引用子组件 -->
<son ref="sonRef"></son>
<button @click="getComponent">获取子组件实例引用</button>methods: {
getRef() {
// 获取元素的引用
console.log(this.$refs.pp)
this.$refs.pp.style.color = 'red'
},
getComponent() {
console.log(this.$refs.sonRef)
// 可以访问子组件的数据和方法
this.$refs.sonRef.count = 1
this.$refs.sonRef.add()
}
}组件的 $nextTick(cb) 方法,会把 cb 回调推迟到下一个 DOM 更新周期之后执行,即在 DOM 更新完成后再执行回调,从而保证 cb 回调可以获取最新的 DOM 元素。
methods: {
  showInput() {
    this.inputVisible = true
    // 对输入框的操作推迟到 DOM 更新完成之后
    this.$nextTick(() => {
      this.$refs.input.focus()
    })
  }
}